Creating a website is fun. You can share your ideas and stories. But sometimes, you may want to keep your website private. This means only certain people can see it. In this guide, we will explain how to make a WordPress website private.
Why Make Your Website Private?
There are many reasons to make your website private:
- You want to share secrets or personal stories.
- You are working on a project and need privacy.
- You want to keep your website safe from unwanted visitors.
Whatever your reason, WordPress has easy ways to help you. Let’s look at how to do it step by step.
Step 1: Log into Your WordPress Dashboard
Your dashboard is the control center of your website. To log in:
- Open your web browser.
- Type your website address followed by /wp-admin. For example, yourwebsite.com/wp-admin.
- Enter your username and password.
- Click the “Log In” button.

Credit: www.youtube.com
Step 2: Go to Settings
Now that you are in the dashboard, you need to find settings:
- Look at the left side menu.
- Click on “Settings.”

Credit: www.websiteplanet.com
Step 3: Change Your Site Visibility
In the settings, you will find the option for visibility:
- Click on “Reading.”
- Find the section called “Search Engine Visibility.”
Here, you will see a box. If you check this box, it means:
- Your site will not show up in search engines.
- People cannot find it easily.
Step 4: Set Up a Password
If you want more privacy, you can set a password. This way, only people you trust can enter. To do this:
- Go to “Pages” or “Posts” in the left menu.
- Choose the page or post you want to make private.
- Click on “Edit.”
- Find “Visibility” on the right side.
- Change it to “Password Protected.”
- Enter a password.
- Click “Update” or “Publish.”
Step 5: Use a Private Plugin
If you want more options, you can use a plugin. A plugin adds special features to your website. Here is how to find one:
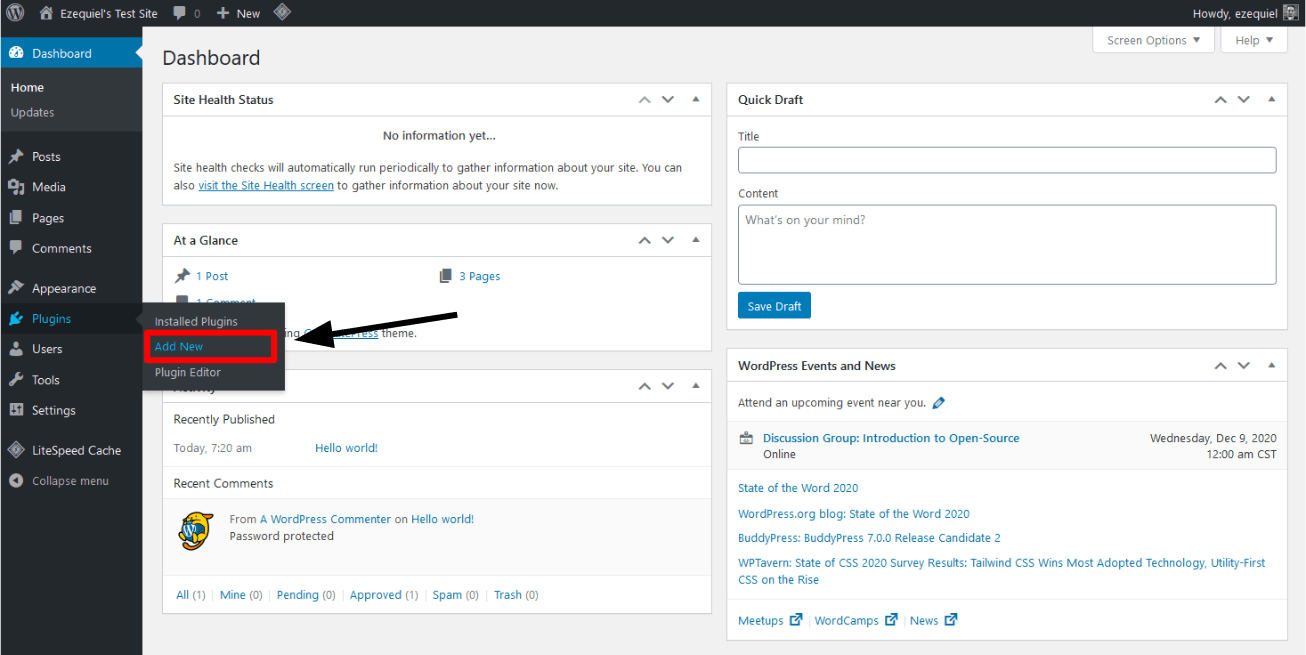
- In your dashboard, look for “Plugins.”
- Click on “Add New.”
- Type “Private Site” in the search box.
- Choose a plugin that looks good. “My Private Site” is a popular choice.
- Click “Install Now.”
- After installing, click “Activate.”
With this plugin, you can set your whole site as private. It also lets you choose who can see it.
Step 6: Limit User Access
Sometimes, you may want to allow only certain users. You can do this easily:
- Go to “Users” in the left menu.
- Click “Add New” or select an existing user.
- Set their role. Choose “Subscriber” or “Contributor.” They will have limited access.
This way, you control who can see your site and what they can do.
Step 7: Testing Your Settings
After making your site private, test it:
- Open a different browser or device.
- Type your website address.
- Check if the site asks for a password or shows a message.
If you see the message, your settings are correct. If not, go back and check your steps.
Step 8: Regularly Update Your Settings
It is important to check your settings often. You may want to change who can see your site. Also, keep your plugins updated. This keeps your site secure.
Final Thoughts
Making your WordPress website private is easy. You can do it in a few steps. First, log into your dashboard. Then, change the visibility settings. You can also use a password or a plugin for better control. Remember to check your settings regularly.
With these steps, you can share your ideas with only the people you want. Enjoy your private space on the web!
Frequently Asked Questions
1. Can I Make My Entire Website Private?
Yes, you can make your whole site private. Use plugins for better control.
2. How Do I Know If My Site Is Private?
Check from a different device. If it asks for a password, it’s private.
3. Can I Change My Mind Later?
Yes, you can change your settings anytime. Just follow the steps again.
4. Are My Posts Still Visible To Search Engines?
If you check the “Search Engine Visibility” box, they will not be.
5. Can I Allow Certain Users To See My Site?
Yes, you can limit access for different users using roles.
Conclusion
Making your WordPress website private is a smart choice. It helps protect your content. Follow the steps above to control who sees your site. Remember to keep checking your settings. Enjoy your private space on the internet!


